Quickly Build Fullstack Vue Apps with Directus
At first, I was skeptical about Directus. I’ve never really been into low-code and no-code tools before.
Usually, I can just write the code myself in less time, so why bother?
But once I started using Directus, I quickly saw the value in it.
It makes so many backend things super simple, and it doesn’t box you in — you still have full control.
In this article, I’m going to show you how I built a survey app using Directus and Nuxt. Along the way, I hope to introduce you to how awesome Directus is, so you can see if it’s right for your project.
Here’s what we’ll cover:
This article was paid for by Directus, but I would never promote a product I didn’t like. So, let me show you why I think it’s a good tool for building backends.
What is Directus?
Directus is a backend-as-a-service, meaning it lets you quickly and easily set up your backend without needing to get into database schemas, building API endpoints, and all the rest (pun intended). It’s really powerful, too.
It’s like a very powerful version of Notion, but designed for developers. It’s easy for anyone on your team to edit and update the data through it’s UI.
But it doesn’t just store data and make it easy to access. Here are some other things it has:
- Powerful flow and automation builder — send an email when a database item is added, or schedule cron jobs to process things daily, or any other complex workflow
- Auth — since it’s always annoying to deal with!
- Connect an existing database — it will introspect your DB and automatically configure Directus to work with what you’ve already got
- Realtime — using either WebSockets or GraphQL (yeah, you can use REST or GraphQL when accessing your data)
It also a ton of other features, but you should just check out their website if you’re interested.
I used it to easily build a survey app without writing anything but a few Vue components for the UI.
The Survey App
The app lets you do the following:
- View a list of surveys, including how many responses they’ve received (and how many were in the last 24 hours)
- View all the responses from an individual survey
- Answer a survey
We’ll restrict creating a new survey to the Directus dashboard, which we’ll show in a minute.
In the future, we could even add some other Directus-powered features:
- Email the survey creator when a new response is submitted (using flows)
- Weekly summary email to give you some stats on how your survey is doing (using flows)
- Charts to analyze the response data, right inside of the Directus dashboard (with Insights)
Those were outside of the scope for this first iteration, but maybe we’ll be able to cover those in future articles.
Setting up Directus for simple CRUD
It couldn’t be simpler (probably?).
I don’t normally like no-code tools, but after spending a few minutes figuring out the interface of Directus, it was a breeze, and I’ve really come to enjoy working with it.
The first thing we need to do is set up our collections and structure our data.
Creating the collections
Our app has the following “collections” (aka database tables):
Here's the schema:
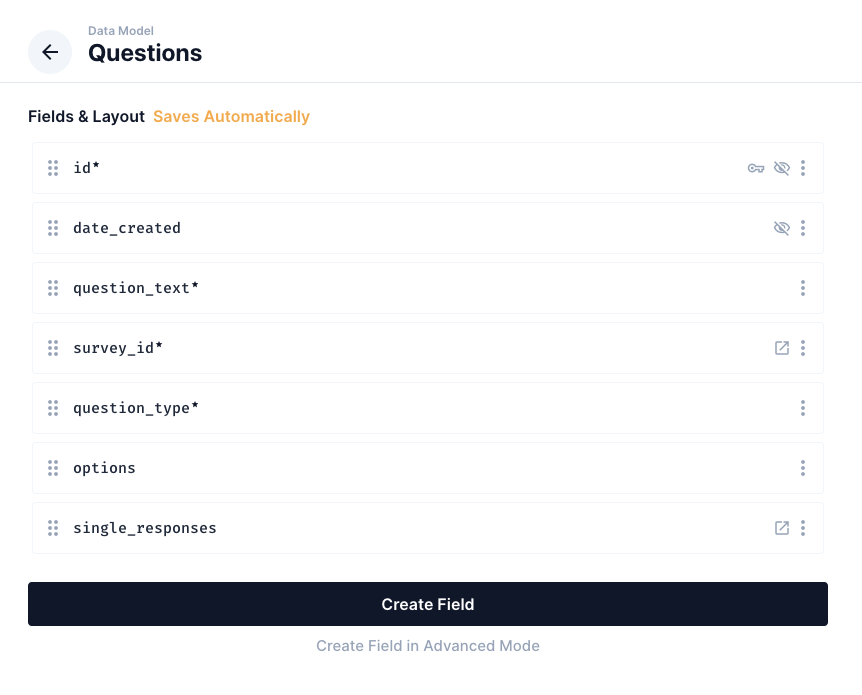
surveys— The top-level collection for a single survey with the fields:iddate_createdtitledescription
responses— Represents a single survey response, which is a collection ofsingle_responses. It has these fields:iddate_createdsurvey_id(many-to-one relationship)
single_responses— A response to a single question of the survey, with the fields:idresponse_id(many-to-one)question_id(many-to-one)answer
questions— Represents a single question, which has these fields:idquestion_textquestion_type—text,multiple_choice,number, oryes_nooptions
To modify the database schema, you need to go to the Settings tab. It took me a bit to figure this one out, but it does makes sense, since this isn’t something you’d need to access day-to-day.
Creating these in the UI is pretty straight forward once you’re in Settings -> Data Model:
- Click “Create Collection”, enter the name
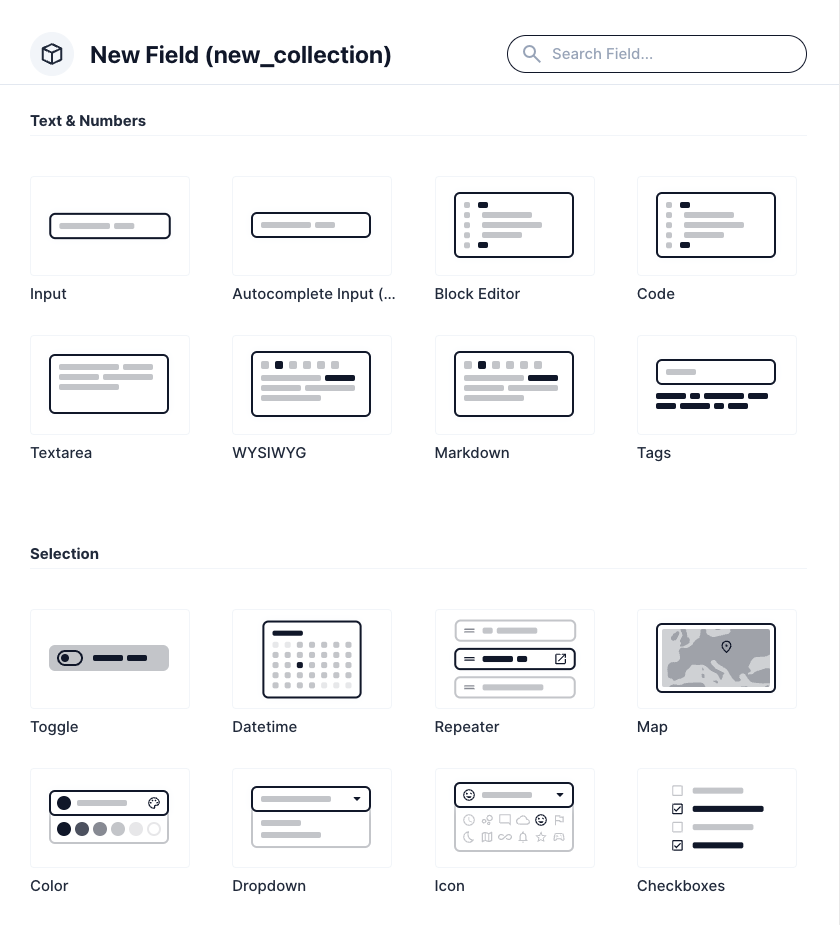
- Click “Create Field”, select the correct type, repeat for all fields
But what’s really neat is that on top of selecting the database type, you can also choose how this field is displayed in the Directus UI. For example, our question_type becomes a drop-down, and if we set answer to JSON we can choose the UI to be a code block so it’s nicely formatted.
Adding in One to Many Relationships
Right now, if we want to grab all the responses for a single survey, we have to do the following:
- Get the
survey - Get the
responsesfor that survey, filteringsurvey_idby the survey’sid - Get the
single_responsesfor all of thoseresponses, filteringresponse_idby all of ourresponsesand theiridfields
Ugh.
This is because we only have many-to-one relationships, so we can’t go from the survey to a response, only from the response to the survey, for example.
Ideally, we would query the survey, then nest all of the related responses, then nest all of the related single_responses, all in a single request. We can do this, but we have to spend a minute setting up the one-to-many relationships so we can go from survey → response → single_response.
Prisma, for example, adds these one-to-many relationship in automatically, so you don’t have to think about it. With Directus, we have to add it in ourselves. But it’s really easy!
We need to go back to Settings -> Data Model, and then for each relevant collection, add a new field. This one will be a “One to Many”. We need to select which collection it links to, and which field on that collection refers back to the current collection.
We’ll do this a couple times for our app:
surveytoresponsesresponsestosingle_responses
Now, when we query a survey, we can also grab the related responses, and then for each response, grab the related single_responses. All in a single query!
Setting up permissions
By default, Directus only allows the admin policy to access data in any way. But it also includes a public policy so we can control what can be accessed without authentication.
We’ll head over to Settings -> Access Policies -> Public Policy and update the Permissions table to look like this:
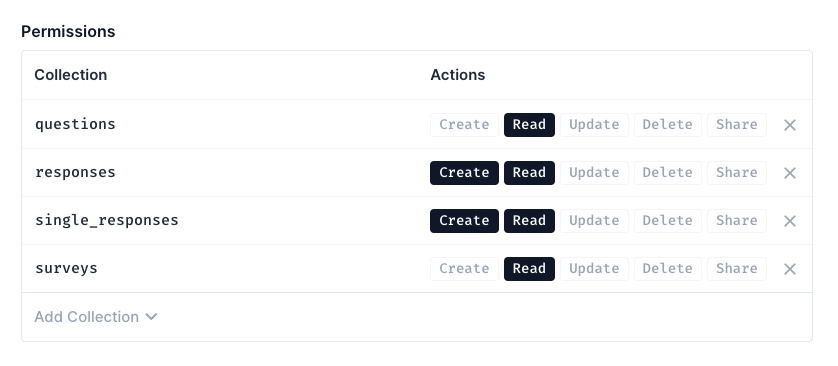
We’ll only allow the admin (which is us) to create surveys and questions, but allow anyone to read the data. Directus has a very powerful policy-based permissions system if you want to dig even deeper into it.
Now, all of our data is secure and locked down.
Creating our first Survey
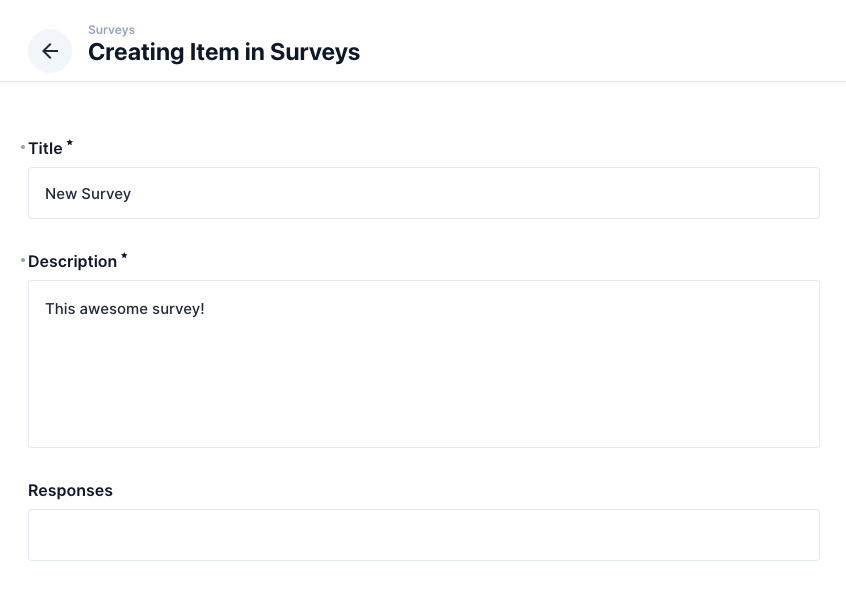
Now, we can actually create our very first survey.
We’ll go to Content and then the Surveys collection. There, we hit the + button to add a new record. Add in the title and description, but we’ll the responses field blank. This is the one-to-many relationship we created earlier, but we don’t have any responses yet!
Next, we need to create some questions!
We follow a similar process here, but we need to make sure to use the Survey ID field to link to our survey object.
With that done, we’re ready to answer some surveys!
Or, at least, build the app so we can answer some surveys.
Building the Survey App with Directus
Using Directus as a database is it’s core feature, and it’s really easy through it’s UI. It took me a little bit to find my way around, but once I did, creating new tables (called “collections”) and modifying them was very quick.
Let’s see the code that I used to connect Directus with my survey app.
Directus Plugin
I’m using Nuxt, so I created a plugin to easily access Directus in my components:
Providing it through nuxtApp means that I can grab this value in my Nuxt app using useNuxtApp().$directus.
I also added types for this new $directus value by creating an index.d.ts file:
Display the list of surveys
For our home page, where we list all available surveys, I used the readItems method:
Let’s break this down.
The Directus SDK relies heavily on this composability — we pass the readItems method into the $directus.request method. This is because we can configure our Directus client ($directus) to do all sorts of interesting things. We can run it as a REST client, like we have here, or we can use it as a GraphQL client. We can also set it up to work in realtime, where it will use websockets to automatically update our apps data when any changes are made to the database.
So the actual operations, like readItems, are separated from the client itself. It’s a pretty good architecture, I think!
For readItems, we pass in the collection name (the name of the database table), which is 'surveys'. Then we pass in the query object, which lets us do all kinds of filtering, sorting, and so on. This query object is pretty standard, and is fairly similar to Prisma, which is what I’m most familiar with.
Here, we use the fields property to select the fields we want: id, title, and description. That last field is a nested value. By default, we’d just get back the id of each response connected to this survey, but we also want the date_created so we display how many responses we got in the last 24 hours.
Finally, since we’re using Nuxt, we wrap this whole async request inside of useAsyncData so it will be properly cached and hydrated in our app.
Our UI shows the survey, the number of responses, and the number of responses in the last 24 hours. To make this easier, we need to transform the data we get back from Directus:
We do this with a computed ref, adding in responseCount and recentResponseCount properties.
Showing all the responses for a survey
If we click on one of the surveys, we’re able to see all of the responses for it.
This happens on the survey/[id]/index.vue page:
This is the most complex query in the app, but most of it we’ve already covered.
We’re using readItem to grab a single item with the id of id from the 'surveys' collection. We specify a bunch of fields, including nested fields, that we want to return. The only difference here is that we’re nesting several levels deep.
Here’s a tip for developing with Directus: you can use wildcards in your field names, like *.* or *.*.*.*. This will return the entire object, but it’s helpful for making sure you’re getting the right data into your UI. Then, you can pull out just the specific fields that you actually need, making sure your request is as small and lean as possible.
The deep field does something interesting: it lets us apply any of these top-level “operators” to nested values. Normally, these top-level operators only apply to the top-level items you’re querying. For example, we can use the sort field to sort the items, but it will only sort the top-level items:
This will give us all our surveys, but sorted in reverse chronological order.
On this page, we’re only querying a single survey, so sorting won’t do anything for us. However, we do want to sort the nested responses to show the most recent ones first. In order to sort those items, we need to use the deep operator:
Now, we’ll get back our survey object with the nested responses, but the responses will already be sorted for us!
And since Directus has done all the heavy-lifting for us, we don’t need to do any extra work. Just pipe the data straight into our UI!
Answering a Survey and Creating Data
This page uses the SurveyForm component to display the form and handle creating a new response in our backend:
Here we’re doing two things:
- Create the
responseand link it to the currentsurveyobject using the survey’sid - Grab the
idof the newly createdresponseobject so we can link it to oursingle_responseobjects. We’re able to pass an array of items tocreateItemsto create them in a single batch.
A couple things to note about this method:
- We’re not using
useAsyncData, since we’re not fetching data - We wrap each request in a
try...catch, because errors happen!
Once the response has been successfully recorded, we then redirect the user back to the survey page, where their new response will show up at the top as the most recent response.
Wrapping Up
Directus is a wonderful tool, and I’ll definitely be exploring it further — it just has so many features that make complicated things easy, especially for a frontend focused developer like myself.
We saw that setting up basic CRUD with permissions is really straightforward, and it’s just scratching the surface of what Directus can do.
If you want to see a longer series on Directus, and see how it works with Nuxt and Vue, let me know!